HMS Queen Elizabeth - Aircraft Carrier - Part 2: islands
I next turned to the islands. At first I'd thought these wouldn't need much work but closer inspection showed that this was not the case. Although the basic shapes weren't bad, platforms were in the wrong places, badly proportioned or missing, the exhausts were completely wrong, the radars looked little like the real thing, the very obvious large display screens were missing, the conservatory (sorry, flying control position) was the wrong shape and size and the casting overall was too blobby.
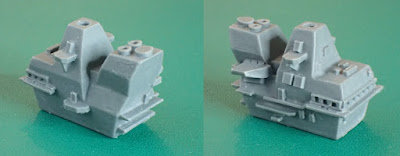

I decided to cut off the details and re-make them from scratch but just dress the basic casting to give the characteristic sharp edges. Because of all the angles, I couldn't possibly do this free-hand so made a set of angled sanding blocks from thick cardboard to use in conjunction with a jig to hold things at 90 or 45 degrees. The front island went very easily but I made several mistakes with the rear island and had to build things back up, hence the large amount of filler and plasticard covering everything in the picture below. I also had to lengthen the rear island which also corrected the proportions of the funnel.

After that it was a case of making lots more platforms and the various radar antenna and sensors.
One part I initially struggled with was making a suitable circular platform for the Artisan radar - I know the reality is a lot more complex with a whole array of vertical aerials (?) arranged in a circle but at this scale, a simple circle would have to do. Unfortunately I didn't have any 4mm diameter x 0.5mm thick discs to hand. In the end, my solution was to cut a rough circle, slightly overside and glue it onto the end of a panel pin, mount that in a power drill and gradually file it down with the drill turning, checking the diameter every so often.

The huge (armoured) glass windows and complex shape of the flying control are one of the unusual and distinctive features of the Queen Elizabeth class. To try to get this looking right, I did as I have with many of the other more complicated features of this build and made a rough scale drawing before trying to put knife to plastic. I scaled this off photos from different angles, averaged those with multiple values then related it back to known dimensions and dimensions that I'd already fixed on the model - in the end, looking right has to take precedence over calculations. I feel slightly embarrassed at doing this on a 'vintage' 1970s drawing board rather than CAD but the cheap CAD systems for Mac-OS that I've tried haven't been a bit rubbish and the latest base-version of the one I used to use is $400 per month which is a bit hard to justify for a hobby.

Another decision I made at this stage was not to depict the windows in the model structure but rely on transfers and paint. Partly this was for ease - it would have been difficult to cut square recesses into the resin and partly that I thought it would better depict the near-flush glazing and narrow frames of the real ship. The 1/350 scale build on Britmodeller had used that method very effectively so I thought if it was good enough for a 1/350 commission for Airfix, it was good enough for me!
For the more delicate parts I used brass rod and fine piano wire with soldered joints. The three Ultra 2500 electro-optical directors are represented by pin-heads filed to roughly the right oval shape.


I decided to cut off the details and re-make them from scratch but just dress the basic casting to give the characteristic sharp edges. Because of all the angles, I couldn't possibly do this free-hand so made a set of angled sanding blocks from thick cardboard to use in conjunction with a jig to hold things at 90 or 45 degrees. The front island went very easily but I made several mistakes with the rear island and had to build things back up, hence the large amount of filler and plasticard covering everything in the picture below. I also had to lengthen the rear island which also corrected the proportions of the funnel.

One part I initially struggled with was making a suitable circular platform for the Artisan radar - I know the reality is a lot more complex with a whole array of vertical aerials (?) arranged in a circle but at this scale, a simple circle would have to do. Unfortunately I didn't have any 4mm diameter x 0.5mm thick discs to hand. In the end, my solution was to cut a rough circle, slightly overside and glue it onto the end of a panel pin, mount that in a power drill and gradually file it down with the drill turning, checking the diameter every so often.

The huge (armoured) glass windows and complex shape of the flying control are one of the unusual and distinctive features of the Queen Elizabeth class. To try to get this looking right, I did as I have with many of the other more complicated features of this build and made a rough scale drawing before trying to put knife to plastic. I scaled this off photos from different angles, averaged those with multiple values then related it back to known dimensions and dimensions that I'd already fixed on the model - in the end, looking right has to take precedence over calculations. I feel slightly embarrassed at doing this on a 'vintage' 1970s drawing board rather than CAD but the cheap CAD systems for Mac-OS that I've tried haven't been a bit rubbish and the latest base-version of the one I used to use is $400 per month which is a bit hard to justify for a hobby.

Another decision I made at this stage was not to depict the windows in the model structure but rely on transfers and paint. Partly this was for ease - it would have been difficult to cut square recesses into the resin and partly that I thought it would better depict the near-flush glazing and narrow frames of the real ship. The 1/350 scale build on Britmodeller had used that method very effectively so I thought if it was good enough for a 1/350 commission for Airfix, it was good enough for me!
For the more delicate parts I used brass rod and fine piano wire with soldered joints. The three Ultra 2500 electro-optical directors are represented by pin-heads filed to roughly the right oval shape.

The mainmast is brass tube with bits soldered to and in it then filed back to the right shape. I don't know what the double A-frame with a pole across the apexes is on the rear island - a play-tent for the air commander? - but making this was especially fiddly.


Comments
Post a Comment