HMS Cornwall - T22B3 Skytrex / Scratch Build 1:1250 part 2
I posted a part two of this build that accidentally missed out a lot of steps so this is catching up properly with those missing stages. I'll repost that accidental part 2 later as part 3.
I made the aft part of the forward superstructure from layered plasticard and attached the SCOT radomes and supporting structure from the kit. A small radome is visible in photos, at the fore end of this and I shaped that from some 0.75mm brass rod.

Despite thinking everything was looking OK with the masts through the magnifier, the close-up picture below shows a different story, with some serious deterioration of the top of the Skytrex mast. I can't believe I missed it before. Two steps forward and one step back: I was going to have to make a replacement.


I wasn't happy with my first attempt at making an Atlantic 22 RIB and decided I actually needed two. The picture below shows my first stage in making these, with a 2mm wide strip of 0.5mm thick plasticard shaped with a pointed end and the edges rounded off then a row of holes drilled down the middle. The lower hull, transom, engine compartment and steering position are each made from additional pieces of plasticard.

Another detail part I made was the Goalkeeper CIWS. This started off with the central piece cut and shaped from 0.7mm thick plasticard with the multiple barrels represented by a single length of 0.2mm wire - given that this scales up to 250mm, even that is probably over-scale, hi-lighting the balance to be struck in these small scales between making things genuinely to scale and getting the look right.


I made the aft part of the forward superstructure from layered plasticard and attached the SCOT radomes and supporting structure from the kit. A small radome is visible in photos, at the fore end of this and I shaped that from some 0.75mm brass rod.

Despite thinking everything was looking OK with the masts through the magnifier, the close-up picture below shows a different story, with some serious deterioration of the top of the Skytrex mast. I can't believe I missed it before. Two steps forward and one step back: I was going to have to make a replacement.

Making the replacement mast was easier than I'd expected. The main part is an old bit of sprue, filed square then tapered and cut to length. To improve strength and give me something to key it to the structure below and into which I can attach the Type 967/968 radar, I've drilled through it axially (before doing the taper) then stuck some 0.75mm brass tube through the middle. The concave conical bit (which I was reliably informed on Britmodeller is the UAA1 ESM aerial array) below the circular platform is from another, bigger diameter, piece of brass tube. It is really hard to keep everything straight an on-axis. At this scale an error of 0.1 mm shows up and I certainly have at least that.
The cross-pieces are 0.20 mm piano wire (several holes in my finger tips thanks to these, before I filed the ends flat) which pass right through, including the brass tube. Originally I intended to re-use the Type 1006 navigation radar from the original model but in the end made a new one from brass, with the T soldered then super-glued into a small hole in the platform. I regret now that I wasn't a bit more ambitious - I should have made some attempt to represent the double arms of the actual pivoting support mechanism.

Next on the list was the Type 911 Sea Wolf radar trackers. As well as various photos, I found some plans online of a Shapeways model. The one thing I couldn't find was anything on the key dimensions and my first attempt, using a simplified version of the 'Shapeways' drawing scaled off the overall height taken from a whole-ship plan looked way over-size and out of proportion. I decided to set that aside to try to find some real dimensions whilst I made some progress with other parts.
I turned then to the main mast. I changed the spars to the thinner 0.2mm piano wire to match those of the fore mast. I didn't know what the large flattened-tube like structures are half way up were but again Britmodeller came up with the answer - shields for the exhausts from the diesel auxilliary generators. The original cast-on ones were blobby and the wrong size so I replaced them with plasticard. I'd intended to make these open-ended (at least at the top) by bending foil around a half-length core but that proved too fiddly and I settled for solid pieces. This area will be painted black so I don't think this will be too noticeable.
I also made the bulwarks (is a fence like this still a bulwark when not at deck level?) out of a strip of foil, using my PE bending tool to get sharp corners. In the photos, you can also see the jib crane, attached to the corner of the hanger, for handling the RIBs. This was made from more 0.2mm wire, soldered to a right angled triangle with the top edge continuing past the short vertical edge to fit into a hole I drilled in the plastic of the hanger.


Another detail part I made was the Goalkeeper CIWS. This started off with the central piece cut and shaped from 0.7mm thick plasticard with the multiple barrels represented by a single length of 0.2mm wire - given that this scales up to 250mm, even that is probably over-scale, hi-lighting the balance to be struck in these small scales between making things genuinely to scale and getting the look right.

The sides were shaped from a 1mm wide strip of plasticard, angled across the width from 0.6 to 0.4 mm then cut to a trapezium with a 1mm wide base. The conical base is the end of a piece of dia 2mm sprue, filed to a cone then cut off 0.5mm thick.The radar dish is dia 0.7mm stretched sprue - it should really be a forward pointing cone but I couldn't see how to do that at such a small size.
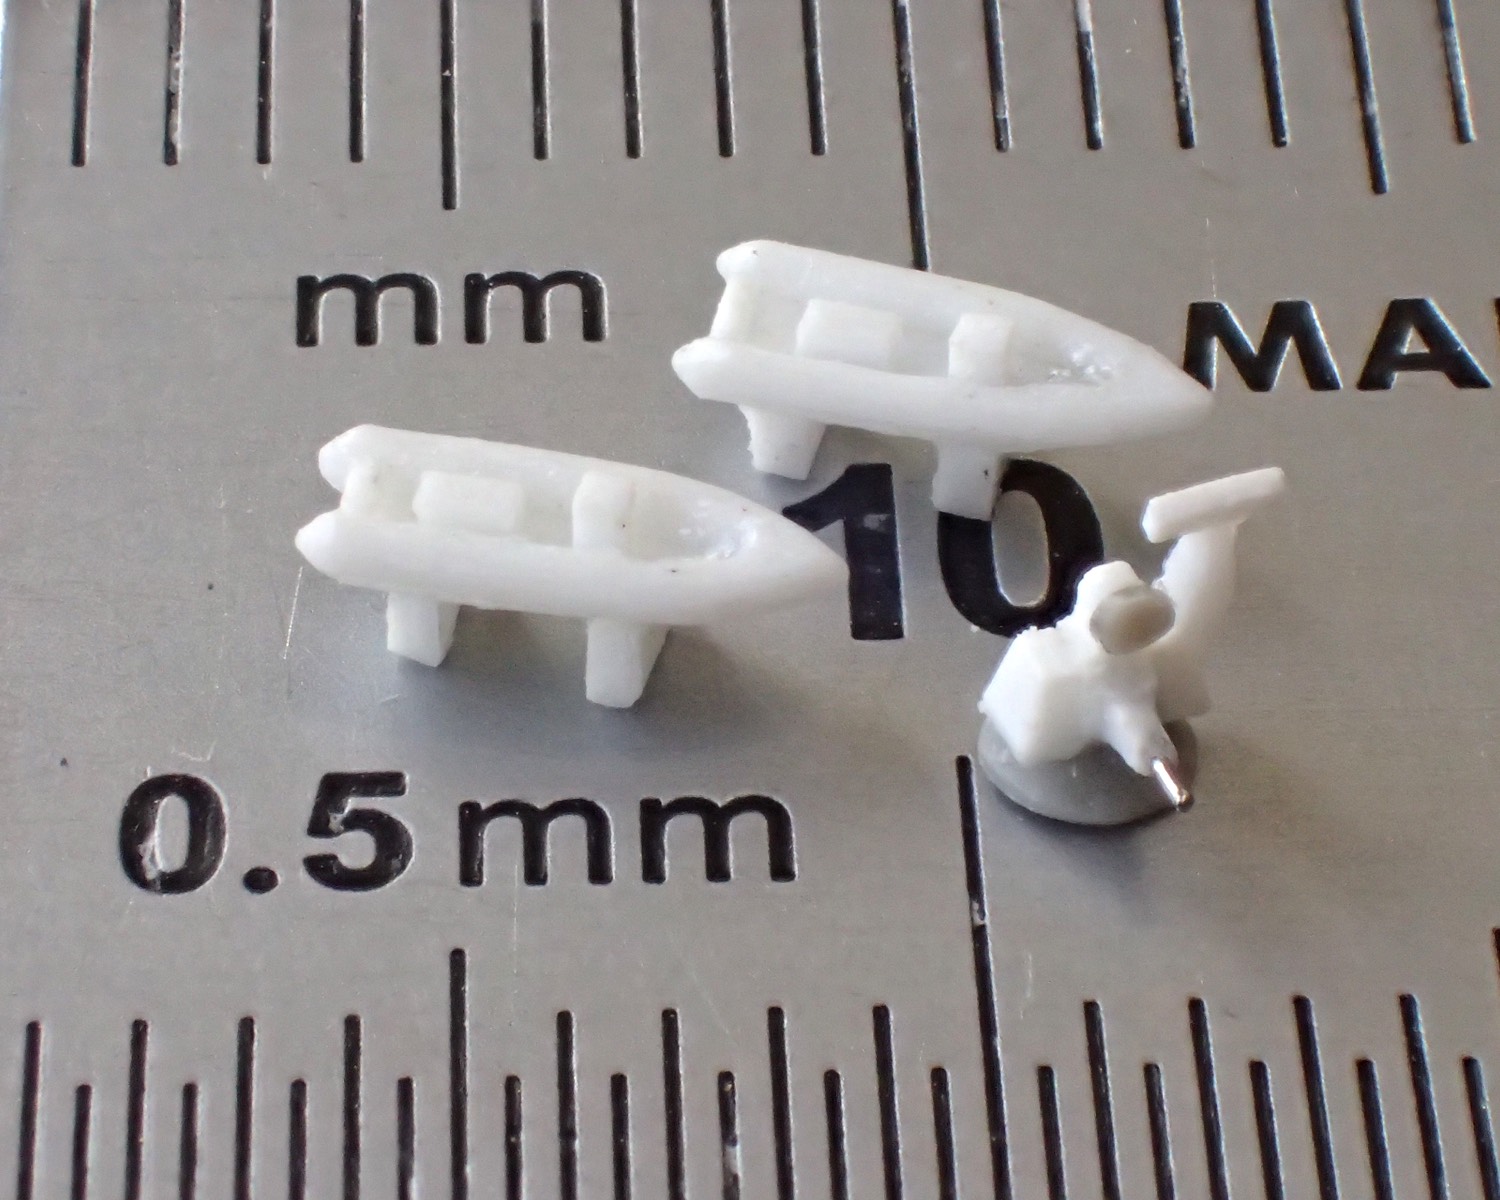
I'm still not really happy with the RIBs. As can be seen in the photo, the shapes are slightly different and I'm worried this will look a bit odd with them close together on the same model. In the end I solved that problem by only using one of them.
These extreme close-up pictures really show every blemish and I'll have a lot of cleaning up to do before final painting!


Comments
Post a Comment