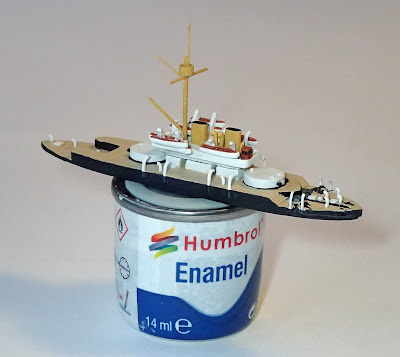
HMS Devastation - Triton 1:1250
I have always admired the simplicity of this little proto-Pre-Dreadnought. As you may have realised, whilst some waterline ship collectors keep their collection to strict boundaries, I am a bit of a magpie. In this case thought it does fit in, as a bookend, for one of the deliberate threads of my collection: the development of British Battleships.
The model is from Red Eagle Miniatures http://www.redeagleminiatures.co.uk who acquired the Triton range of ironclads. The models are clearly intended for wargames use and tend to the robust and cartooned end of the spectrum. They have deep moulded in deck planking, with planks that are the scale equivalent of five feet wide so the first item on the agenda was to fill in the trenches between them with watered down Milliput.
Although I have several books on ships of this period, including D K Bown's Warrior to Dreadnought and Oscar Parkes Brittish Battleships, I was struggling to get really good reference photos - a task not helped by the radical rebuild the ship had in 1891. The best source I found was the National Maritime Museum's online collection of photos of their models which include a contemporary 1:48 model of HMS Devastation as built This hi-lighted a number of issues with the model where important features were either just suggestions or missing altogether.
I filed all the blobs and protuberances off the hull and started again with brass rod, wire and lead foil. The obvious stepped section in front of the front turret was a simple angled slope on the model so I cut this out and rebuilt it with ten thou plasticard. I found it very hard to get a uniform curve to the davits so bought a little pair of round-nosed pliers from Hobbycraft's jewellery range with the handles in a particularly eye catching bubblegum pink. With these it was easy to get consistent and satisfactory results.
I have a sheet of photo-etch anchors and used 4 of these. The sheet is very thin so I had to first glue some wire to the back to lift them up far enough from the deck that they wouldn't disappear into the first layer of paint. One thing that gave me a lot of trouble was the cotton I used to represent anchor chains - stray fibres all over the place! There must be a better way - what do other people do?
The mast was made by soldering brass rod - my usual method. The two derricks were a particular challenge to get a secure location and I filed a small flat section, made a small indentation with a needle held in a pin vise then drilled a shallow hole before soldering. The crows nest was made from plastic sprue, drilled out to a cup form and this provided reinforcement for glueing the upper mast extension - I normally avoid glue but in this case there was no possibility to solder with so many other soldered joints nearby as well as the plastic crow's nest.
After washing the model to degrease it, I sprayed it with Halfords primer and then brush painted with Vallejo. The decks are the usual Iraqi Sand and the buff masts and funnels are Yellow Ochre. The natural wood on the boats is Red Leather - a mistake: I should have used Mahogany as I did on HMS Exeter.
A lot of larger models of black-hulled Victorian ships make an attractive feature of the red hull - white waterline but this just wasn't visible in the photos and, even if it had been, at 1:1200, I just couldn't think of any possible way to paint such thin lines.


Comments
Post a Comment